Thursday, December 15, 2011

Shabby Chic-ing It

Hi All! The Print Candee Creative Team is having a blog hop! You can start the hop on the Print Candee blog here, and if you get lost, here's the order:
Jocelyn <--You're here!

This month, we were all assigned to make a card using a different style (vintage, traditional, graphic, fun/cute, and shabby chic). I got shabby chic....definitely out of my element! While I couldn't make a card with tons of layers, I embraced the challenge and came up with this card:


I started off using Lilmade's Vintage Pastel Digital Papers--so gorgeous! I printed, trimmed, and sewed the strips of papers together using various stitches on my machine. Here's a close-up of the papers:


The card is a birthday card for a girl turning seven, so I used Spellbinders and Quickutz dies to make the label and the "7."

Print Candee is giving away some gift certificates (see here) and always has awesome freebies (see the Jessi tree). Be sure to comment along the hop to increase your chances for the awesome prizes! You have until the end of the day on the 17th to comment for the prizes.

Next, you can check out Kalyn going vintage!

Monday, November 28, 2011

Bows and Berries Blog Hop

Happy Monday! If you're following the Bows and Berries blog hop, you should be coming from Janet's blog. Or, you can start at the beginning from the Bows and Berries site. The B&B site also gives details on the digis you can win from the blog hop and the current challenge.

For biweekly challenge, we're all using this month's freebie Toasty Gingerbread Man stamp (check out the Bows and Berries blog to download this little guy). I wanted to create a scene with the gingerbread man, so here's the card I came up with:


There were about a zillion steps to this card (making a template, die cutting, glittering, misting, printing the stamp, masking, coloring, fussy cutting, etc.)...I'm surprised I wasn't raiding the recycling can to make my own cardstock. In the end, I realized I forgot to put on a sentiment, but I couldn't bring myself to start over. So just imagine a good sentiment, okay?

Here's a close-up of the B&B gingerbread man:


Want a chance to win some free digis and see a variety of uses for this little guy? Join the hop and comment along the way.

To join in the current Bows and Berries challenge, you'll need to use the gingerbread stamp to make anything you want...no rules as long as you use the freebie stamp. You have until midnight (GMT) on December 11th to link up your project on the Bows and Berries blog.

Robin also has 50% off everything in her shop if you use the coupon code "GIFT50." Check out the Bows and Berries site to see what she has.

Next up in the hop is the fabulous Kasia!
For my regular readers, I apologize for being so absent from blog world lately. I've been working on a large, short-notice project for work everyday for about 10 days (working on Thanksgiving blows). I'm getting close to the end, but it's been a lot of late nights and has pretty much zapped all of my free time (and creativity). So I'm terribly sorry for not visiting your blogs--you all mean so much to me, and I feel bad when I can't visit. I miss seeing what you're up to!

Thanks for looking! Have a great week!

Here are the details
Cardstock: (white) Papertrey Ink, (grey) DCWV
Stamps: (Toasty Gingerbread Man) Bows and Berries
Ink: (blue) October Afternoon Sprinklers, (Vanilla) Smooch Spray
Dies: (tree, stars) Hero Arts, (circle) Spellbinders
Glitter: (chunky crystal, smooth crystal) Martha Stewart
Markers: Copics
Twine: Twinery

Wednesday, November 16, 2011

Washi Overload

Happy Wednesday! Just a quick post to share two cards for the Create blog's washi tape challenge. I'm supposed to be working, but I wanted to share a couple of cards I made last night. First up is the hexagon card:


I put five different washi tapes from Chickydoddle (on Etsy)  on cardstock and then die cut the paper using a Sizzix hexagon die. Then, I mixed up the hexagons and added some Thickers and bling. For the background, I used a Hero Arts Cling Dots background stamp to stamp the cute polka dots. Here's a close-up:


For my next card, I was inspired by something on Pinterest to make a birthday card:


I used the Lawn Fawn "Bake Me a Cake" set for the cake base, sentiment, and candle. I layered different Chickydoddle washi tapes to make the cake layers, and I used a Zig to outline the cake layers. The patterned paper is from Webster's Pages. Here's another angle:


Aren't they cheerful? Thanks for looking! I'm still getting through my reader...over 1000 posts. Yikes!

Have a great day!

Monday, November 14, 2011

Little Mittens

Bows and Berries' new challenge is to make a tag. Anyone out there making a tag? Anyone? Link up on the Bows and Berries blog. Yep, it's that easy. And while you're there, you can pick up the free digi and some other cool digis, too, like the Toasty Mittens stamp I used in my tag today:


It was so easy, I made a second one using the same Fancy Pants collection:


The stamp is actually a pair of mittens. To make the tag, I printed a pair of mittens and fussy cut the larger of the two to make the tag base. Since you can resize the image, you can make the tag any size you want (well, maybe not any size...let's be reasonable). Here's what the original stamp looked like:


I paper pieced the layers and then flocked the cuff. At first I was going to leave the tag alone (you know, be super CAS), but then I realized the the tag should be functional. Therefore, on the back I used some Waltzingmouse Stamps for the sentiments:


The paper is the backside of the double-sided paper. You could easily switch the paper and sentiments out to make a cute baby tag (you know, Three Little Kittens and all that jazz). I finished the tags off with May Arts ribbons (love their ribbon!). These tags were super easy, and you could easily mass produce them.

So, if you're making a tag this week or next, be sure to link up on the Bows and Berries blog. Also, check out my lovely design teammates' tags, too.

Thanks so much for looking! I really appreciate it!

Sunday, November 13, 2011

Fa la la la la la la la la

I've had an idea for the Moxie Fab World Tuesday Trigger for over a week, but I finally got around to making the card. Here's the trigger:


I did what Karen suggested about looking at a photo and then stepping away to see what you remember. I kept thinking of the pink/blue/yellow linked together and all of the gold, so I made a Christmas card with those elements:

First, I misted cardstock with each color. Next, I die cut the base and snowflake layers from Memory Box and then embossed the snowflake layer. I'm not much of a heat embosser...I think I embossed each one 3 times to get a relatively smooth gilded look...ha ha. Here's a close-up where you can see the misting:


I am officially addicted to mists. And, I have to say the Memory Box dies cut amazingly well...no struggling to get the pieces out like some dies.

I also used the PTI Linen impression plate on the base and stamped the Technique Tuesday's Good Cheer sentiment.  Here's a close-up:

If you go onto the Moxie Fab World site, Cath posted a great tribute to Katie Renz. Cancer really sucks.

Enjoy the rest of your weekend. We had our first (momentary) snowfall about an hour ago...it's officially winter.

Friday, November 11, 2011

Bring on the Sun

Happy Friday! For Unity's Friends with Flair, I'm sharing that was published in Paper Craft Magazine's 365 Cards:


The beach scene is from Unity's "Fly...Free" KOM, which I stamped over a heavily-misted panel. The sentiment is a digital stamp (Ali Edwards's "Bring on the Sun"). The misting is very shimmery, but hard to see in photos. Here's a close-up:


Oooo...love that shimmer! It's over the entire card, but you can see it in the photo on the sentiment. For details on the products, you can see the magazine.

I also wanted to share that I'm being featured on "Fascinating Fridays" over on Paperie Design Studio! I was pretty darn excited when Tammy asked me. Hopefully, I don't sound like too much of a dork. (Just humor me.)

My husband had his wisdom teeth removed yesterday. The doctor told us after the surgery that having them removed in your 40s is much harder than in your 20s, but my hubby is doing pretty well. The kids and I whipped up a batch of chocolate chip cookies for him, which seem to heal anything faster. LOL!

Thanks so much for stopping by today. Have a great weekend!

Friday, November 4, 2011

Believe

Happy Friday!

Remember learning in school about how people used to post quarantine symbols on their houses so people wouldn't come near? Yeah, that's what we needed on our house recently. My daughter and I traded a stomach bug back and forth for about 8 days. We're both almost back to normal, and luckily, my son and husband seem to be okay. Whew!

Anyhoo, I wanted to make a project to join in with Unity's Friends with Flair since I've missed the past few weeks. I used the Play Date Cafe colors (PDCC 106--pink, grey, yellow) to come up with this card:


Love the sentiment! It's from Unity's "She" set...love that set, although I don't know if it's still available. The ink drops are October Afternoon Sprinklers (the Sidewalks collection) as is the patterned paper.

While I was making this card I realized I need a good grey ink. I have Memento's London Fog (although I used a marker for this card), but it's very bluish. Does anyone know of a more neutral grey?

Some good news: Last weekend, I managed to finish up a few Paper Crafts submissions while having an oogie stomach--yuck. I didn't get most of my projects completed, but I did get one project accepted. Wa-hoo!  Also, my daughter's art project is being displayed at the community's fine arts center and they have a reception tomorrow (she was 1 of 3 for kindergarten). She's pretty "meh" about it...I think she'd be more excited if it were a Math Bowl or a Barbie reception. LOL!

Have a wonderful weekend!

Tuesday, October 25, 2011

Fall Mums

Happy Wednesday! I'm finally getting over my lousy cold...luckily just in time for today's Print Candee October Blog Hop. If you're not coming from Jen Wills's blog, you can start at the beginning on the Print Candee blog. Here's the order in case you need it:

Jen Wills (Guest Creative Team member)


This month's theme is "Fall and Spring" (since it's fall here and spring for some of my Print Candee teammates in Australia). I saw some beautiful mums in the Print Candee store that were so inspiring, and here's the first card I came up with:


Aren't they gorgeous? The mums stamp is "14 Chocolate Flower Blossom Motifs" from Life is Groovy. All I did was layer them in Photoshop and added my own sentiment. ETA: The font is Chanel from dafont.com.  It only took me about 15 minutes to get the card base done (well, maybe 20, but that's only because I was fiddling with the font). I printed the image on PTI Rustic Cream and added some bling from Prima and twine from May Arts--easy as pie.

I always seem to use colored images (or colored inks) on white or cream, but I I decided to see what the images would look like on other cardstock bases. First up, I tried the image on kraft:


Hmmm....more subtle. I also tried dark brown (it had a Versamark-like look) and pink (pretty, but peach would have been better). Finally, I made a card set using ecru-colored textured Bazzill. I changed up the sentiments and otherwise kept them super simple:


As part of the hop, Print Candee is offering three giveaways: two $10 gift certificates to the Print Candee store and one $15 gift certificate to Two Peas in a Bucket. For a chance to win, leave a comment. The more comments you leave along the way, the more chances to win. Plus, there will be a prize drawn just from the Print Candee blog, so be sure to visit their blog! You have until 11:59 EST on Saturday, October 29th to leave a comment for the prizes.


Have a wonderful rest of the day. Thank you so much for taking the time to visit! Next up in the hop is Marion.

Wednesday, October 19, 2011

The Never-Ending Card

Happy Wednesday! Last weekend, I began a card. For whatever reason, though, cards have not been coming together easily for me lately. Four days later (on and off, of course), I got the card the way I wanted it, and after all that fussing and a zillion steps, the card turned out really CAS:


The card started out with the digital Hero Arts Sillyscape brush, and made the cityscape. I've never used brushes before and I only have Photoshop Elements (it seems that most tutorials use Photoshop CS5), so there was a definite learning curve. I altered the color and opacity of the stamp and then "stamped" the image twice in a row. With some fiddling, I was able to get the two images to look seamless. Yeah!

After I got the cityscape, I made a mask and blended Distress Inks to make the night sky. I added glitter below to make it look like snow, and then went over the entire panel (with the mask still on) with a Smooch glittery mist to make it look snowy. The glitter and the misting don't really show in a photo, but here's a close-up where you can see how the image stamped twice in a row looks like one image:


I made the sentiment in Word (Two Peas' Journaling font...probably my fave) and die cut the frame. I added a little ribbon, and voila. Of course, there were about 50 more steps in the trial-and-error phase. LOL!

I'm entering the card into the Hero Arts October contest of holiday cards using non-holiday stamps.

Thanks so much for looking! Have a great rest of the week!

Monday, October 17, 2011

Peter Piper

The newest Bows and Berries challenge, Inspirational Colours, is based on a picture from Design Seeds:


I started making one card and then it morphed into an entirely different card (anyone else do that?). Here's what I ended up with:

The cool top of the tree is Sun Love from Bows and Berries. Yep, it's a sun that I turned into a treetop and colored with Copics to look like fall (well, the inspiration colors actually). This cute stamp could be used as a planet or a ball...there are all kinds of possibilities. Here's a close-up:


The awesome sentiment is from Unity's "Fly...Free" set, which is probably my all-time favorite kit (and a kit which I used for a pub coming out next month--woo hoo!). The little tree trunk is the Teardrop Tree die from My Favorite Things.

If you like these pretty fall colors, please join in with the Bows and Berries challenge...the details can be found HERE.

Thanks for looking! Have a great day!

Friday, October 14, 2011

Together Forever (For Real)

Just a quick post to join in with Unity's Friends With Flair.

My brother-in-law got engaged last week to a very sweet woman. I'm really happy for them...they were both burned pretty badly in their first marriages, and it's nice to see my brother-in-law so happy again. When they told my in-laws about their engagement, they both said they wanted to do everything they could to make it work. With that idea, I made a card to celebrate their engagement:


I used Unity's October 2009 store KOTM ("Wonderful...You") for the hearts and the sentiment. The hearts were stamped, embossed, and fussy cut, and the cardstock panel was dry embossed with the PTI Linen IP (squint, squint). The natural twine from May Arts finished the card.

Thanks for looking! If you get a chance, join in with Friends With Flair. Have a great weekend!

Wednesday, October 12, 2011

It's the Great Pumpkin!

Yesterday afternoon, when I stepped outside to walk to my daughter's school, it really hit me that it's fall. While it's been "hot" here, the sun was lower in the sky and it reminded me how quickly the days are shortening. Yikes! I love fall, though, and I'm excited for Halloween.

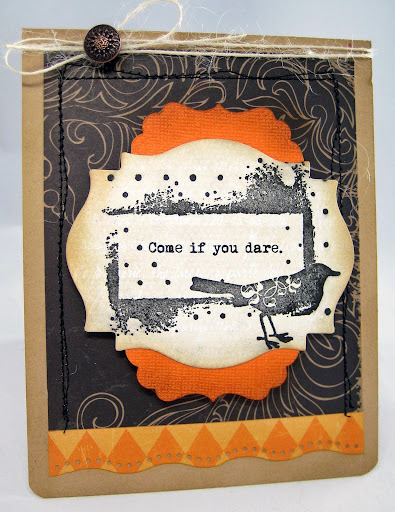
I've had an idea floating around in my head for a Halloween card, and I love how it worked out. In fact, I liked it so much, I made three variations! Here's the layered version:


While there were several steps for making the pumpkins, they were pretty easy to make. I used my dwindling stash of Amy Tangerine and AC Nightfall papers and die cut ovals with my Nesties. I played around with the layers and then stitched them onto the card base.

For the background, I stamped the Dash Pattern background stamp from Hero Arts with Versamark. I used PTI's Edgers #1 to make the bottom strip and then adhered the strip of paper from Studio Calico's Autumn Press at the bottom. I made the sentiment in Word and printed it onto the patterned paper. I totally dig how the brown and black look together...it's not a color combo I ever use, but I'll be using it again.

I'm linking this card up to the E.A.D. Designs "Be Thankful Color Challenge" that I saw on Amy's blog. There are other colors peeking through, so I hope it counts. If you get a chance, check out the challenge!

I had extra pumpkin layers, so I made more cards. Here's the CAS version:


On the base, I printed the sentiment (Two Peas' Journaling but expanded), but otherwise used the same Hero Arts stamp and patterned papers. The orange base paper is also from Autumn Press, and the twine is May Arts (love their natural twine!).

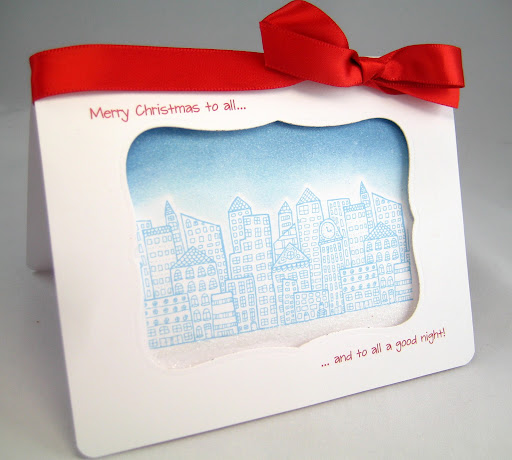
Lastly, here's a small card (4 1/4" square). I went WAY out of my comfort zone (more like out the door and down the street):


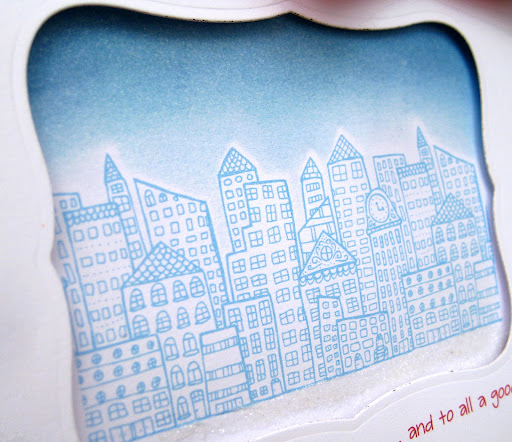
I started with the same base but then painted the edges, used several Distress Inks to provide depth, and (shriek!) distressed the edges lightly. To me, the edges looks like fog--I love how it turned out! Like the CAS card, I made the stem of the pumpkin out of brown cardstock.

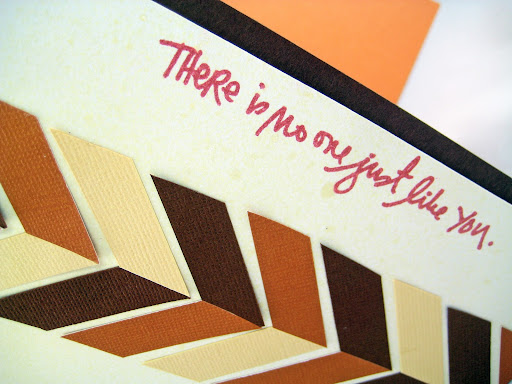
Here's a close-up of the layers on one of the pumpkins:


The layered pumpkins have so much texture (and movement). I thought I'd link up to the Moxie Fab World Textured to Perfection Challenge (especially the last card with the painted and inked edges).


I wanted to pass along that Print Candee reached 1000 fans on Facebook, and to celebrate, they are having an amazing giveaway on their blog. They are giving away a $100 Amazon and $50 Michael's gift certificates (wow!). Go to THIS post to check out how to leave a comment to enter, and while you're there, check out the blog!

Thanks for looking! I hope you're having a good week!

Sunday, October 9, 2011

Chevron Feather

I grew up in the Phoenix area, and I still love the southwestern motifs--the colors, the angles, the repetition of patterns. So even though the the Moxie Fab World Tuesday Trigger is a dessert, the colors, the rustic feel, and striped layers reminded me of a southwestern vibe:


So, playing with the southwestern feel and stripes, I came up with an idea based on a feather. I must say I find some irony in the fact that I thought of a feather when I looked at an overloaded dessert (maybe I thought it was a low-cal dessert). Anyhoo, here's this card:


This card is actually my second version. The first one had the feather's quill, but there were some wonky issues with balance (it didn't look right unless I made the card about 9" tall). Oh well...live and learn. In this version, I eliminated the quill and ran the chevrons all the way down. I also left the chevron edges unglued to make the edges more feathery, so some of the points are a little curled up.

The chevrons are over a golden shimmery Bazzill that I misted with Mr. Huey's Cream. It's a little hard to see the misting in the photo, but here's a close-up:


The sentiment is from Technique Tuesday's Studio AE's August set (isn't it a fab stamp?). I also added a thin strip of wood veneer along the side. Beside the fact that I am addicted to my husband's stash of veneer lately, I think it works with the rustic look of the card.

Thanks for looking!

Thursday, October 6, 2011

Come if You Dare

This week on the Create blog, Paige put out the challenge to create a Halloween party invitation. I love Halloween parties. Actually, I just plain love Halloween!

I was all set to make a CAS, fun card, but while I was putting away a Unity stamp from another project, a stamp caught my eye. So, I changed my card entirely and came up with this one:


This card was pretty simple to make (other than the sewing...my machine is having tension issues). First, I created the sentiment in Word and printed it on Basic Grey patterned paper. Then, I broke out my stamp positioner and used it to stamp the Unity bird/frame image from the "When I'm With You" KOTM. I was holding my breath that the sentiment would be in the right place! Then I die cut the stamped image and at die cut another frame behind. Here's a close-up of the stamped image:


If you look carefully, you can see that the cream is actually patterned paper with writing on it. I went around the patterned papers with my sewing machine and added some twine and a My Mind's Eye button.

I'm joining in with Unity's Friends With Flair this week. If you get a chance, play along!

On a personal note, I found out that the big Federal grant I wrote in June got funded--woo hoo! It was a pretty good size grant (about $3 million), but unfortunately, I don't get any of the money (I wrote it for a client). I wish I could write grants for myself, but there aren't a lot of paper crafting grants out there. Ha!

Have a great day!

Monday, October 3, 2011

Poker Christmas

I wanted to write a quick post to join in the Moxie Fab World Card Play Challenge.

When I was about 8, my grandparents taught me how to play poker. They never went to casinos or were gamblers, but they had grown up in the pre-Depression-era playing card games and wanted to share all of the fun poker games.  Every time I visited, we played for several hours a day (for money, no less), and I learned a lot! Playing was all fun, and I'm sure my grandfather folded good hands on a few occasions to let me win. Although I never play anymore, I have very fond memories of playing cards with them. Sorry to ramble on!

I inked up my Unity Suzi Blu stamp again to make a card based on playing cards:


Her dress is (obviously) made from a playing card, and the heart in her hand is fussy cut from the five of hearts. In the stamp, she's holding flowers in her right hand, so I masked the flowers to only show her hand.  Otherwise, I just paper pieced the rest of her outfit and colored her with Copics and colored pencils. Here's a close-up of Suzi:


Very stylish! I wish I could wear her outfit!

I went back and forth on the sentiment, but I really liked this one from Waltzingmouse Stamps. It's a little quirky for a Christmas card, but I'm the type of person who likes a little quirkiness now and then (okay, maybe all of the time).

Once I finished the front, I liked it so much, I decided I would frame it for Christmas decor. Of course, I realized after I had cut the front panel that it's a non-traditional size and will require a mat. I wish I would think of these things in advance--ha ha!

Thanks for looking! Have a great day!

Trick or Treat

Happy Monday! Bows and Berries has a new challenge starting this week, based on a Halloween inspiration pictures (see here). I decided to use the new "Thumbs Up Monster" to make lollipop covers for Halloween treats:


Now I had visions of cranking out 24 of these covers for my daughter's class, but after envisioning the kids ripping them apart in .02 seconds to get at the candy, I think I may be coloring this little guy in Photoshop for the class treats. [That's the great thing about digital images!]

Here's a close-up of the orange monster:


And here's a close-up of the yellow monster:


He is so cool! If it hadn't been a Halloween picture, I probably would have put him on a surf board or given him drumsticks (stay tuned for that!). But, I wanted him to hold something in the other lollipop cover, and since I am certifiably addicted to the toothpick flags the past few weeks, I made one for him to hold. The sentiment is from the PTI Tag-Its.

I don't normally let my 5 1/2-year-old daughter get near my Copics, but she wanted to help color the monsters. She did a great job! Here's one that she colored:


Isn't the blue and orange cool? I love it!

So if you get a chance, visit the Bows and Berries blog and try the challenge! There are some great inspiration pictures from the Design Team.

Have a great day! Thanks so much for visiting! :)

Friday, September 30, 2011

Print Candee Bookmarks

It's been busy, busy, busy! My mom was here (from Maine) early in the week and I attended a multi-day training session later in the week. Plus, all week I've been fighting some type of cold that's settled in my chest--ugh. But, it's the weekend and tomorrow is World Cardmaking Day--yeah!

This month, the Print Candee Creative Team made projects with the theme of "little gifts." Fun! I decided to make a bookmark set, but I went a little out of control! There were so many good images that would work...I love that about Print Candee.

When I made these bookmarks, I had my in-laws in mind...they are avid readers. I started off by making a set of seasonal bookmarks using Pink Pueblo's Four Seasons Trees:


Once I figured out the best strategy, they were super easy to make. I started off using Photoshop, but I found it was easiest to just save the jpegs in Word and resize them all the same. Then, I used my Papertrey Ink Bookmark die (although you could just cut them, too). To finish all of the bookmarks, I cut a second bookmark in patterned paper, attached it to the backside, and tied a ribbon on top. As a tip, you could use Print Candee papers to easily match both sides. Here are the backs:


I did leave off the winter. In South Dakota, we really don't need a reminder about winter--LOL! Aren't those trees gorgeous? They would make a nice notecard set, too. Here are close-ups of the seasonal bookmarks:


Love the summer tree (the last one)...I think it would work for fall, too. You could stamp a sentiment on any of these, too.

When I was looking through the Print Candee website, I ran across Digital Potpurri's Cherry Blossom stamps. Holy cow, is it a pretty set! It was tricky to size these well for the bookmarks, but here are two I made:


Here's a close-up of the cherry blossoms:


For the butterflies, I did use the png files in Photoshop to layer the butterflies and recolor them. The butterfly on top is an orangish-red, although it's hard to tell in the photos. Here's a pic:


Finally, I wanted to make sure I had a more masculine bookmark, and I found Life is Groovy's Birch Trees Spring/Fall set. In Photoshop, I simply layered the birdhouse on the tree. I finished it off with some May Arts natural twine. I think it's my favorite!


Thanks for taking the time to look through all of these pictures. It was so much fun to make these...I may be making about 50 more for Christmas!

Have a great weekend!
Blog Design by Caked Designs